KG-1000G Install

Mal
Feb 04, 2023

Trusted and Carefree

Feb 04, 2023

Hi Friends.

As one of the radio nerds around here, I wanted to put together a write up for my GMRS Radio installation. I got into GMRS from a discusion a couple years ago that was posted by BN OG @BuzzyBud. I ran an Midland 275 in my car for a while, and then when to a Radioddity DB-25G (that I really liked), but wanted to mount something with more functionality in the Bronco that wasn't going to sit in the middle of the dash.

I elected to go with a Wouxon KG-1000G radio, mainly because of the ability to remote mount the controls and stash the radio chassis somewhere else. We have an extensive repeater network here in New Mexico and the radio has a ton of slots to program, and it is 50 watts, which while overkill for what I needed, will be fine (Im of the opinion that any mobile radio north of say 15 watts is fine for trailcoms).

I have been using this radio as a basestation while I waited on my bronco, but now that it has arrived, It was time to put wire it in. I will break yo the install a few posts as it was a lot and post below.
2023 Wildtrak. "Sometimes you got to get lost, to get found" -J Bronco
LoneRanger, Daisy76
Last edited by a moderator: Feb 04, 2023

Trusted and Carefree

Feb 04, 2023

#1
The first step was installing the chassis. I wanted to use @Mountains2Metal in dash bracket, but the space above the glove box did not fit. So onto plan B.

There is a reasonably large amount of space behind the fuse pannel on the drivers side. I was able to use one of the existing studs to secure the radio back in this space. Because the radio speakers are on the chassis, it made sense to me to have it where I could hear the unit. There is also a speaker in the mic, but I didnt want to rely upon that. The radio also has a programming cable port on the side of the chassis, and needed to be able to access that, so I ran a waterproof cat 5 pass through to that and stuck it under the dash where I could get to it.

image1 - Copy.jpeg
Chassis on mounting bracket. Programming Port is the PC thingie on the side.
image2 - Copy.jpeg
With the Cable pass through
image0 - Copy (2).jpeg
The stud in the picture is what I bolted the mounting bracket onto. Gives me about 3/8inch of airflow between everything.
image3 - Copy (2).jpeg
This is the view from underneath. I wanted to keep my cables accessible- I am not 100% on the antenna position yet and did not want a big deal to move it. The head cable plug into the front of the radio, so I plugged it in and positioned it straight up in behind the fuse box.
2023 Wildtrak. "Sometimes you got to get lost, to get found" -J Bronco
Deano Bronc, BroncOitis

Trusted and Carefree

Feb 04, 2023

#2
There are some other options under here too- There is a metal brace that runs under the steering column that I thought about using. Again I could not make it fit (the radio is too darn big) but that would be a good option for folks.

image6 - Copy (2).jpeg
image5 - Copy (2).jpeg
image3 - Copy.jpeg
This one is just the lower dash flopped down. It was a bit unnerving moving it out of the way, but after a few clicks from the clips it was good to go.
image4 - Copy (2).jpeg
This one is what the programing port looks like when everything is buttoned up. It is just kinda stashed back there until it is needed.
2023 Wildtrak. "Sometimes you got to get lost, to get found" -J Bronco
Deano Bronc, BroncOitis

Trusted and Carefree

Feb 04, 2023

#3
I chose to power the radio directly off of the battery. The downside of the big radios is that the 12v plugs arent enough, so I took ran the harness through the firewall at the empty gromit that is sitting behind the dash. I grabbed it from the engine bay side, cut an X, and ran my cables through. I also ran the antenna cable through too, but will show you that st up in a later post.

image9.jpeg
this is the grommet
image11.jpeg
And here is the hole with it removed.
Iimage8 - Copy.jpeg
I cut an x for my cabling...
image9 - Copy.jpeg
..And Cut everything to length. I spliced in the middle of the wire so I could keep the fuses near the battery.
image14.jpeg
I crimped and shrink wrapped my connections and ran them right to the battery. I zip tied the little bit together to the side of the inner fender by the fuse box.

I know that many folks are going to want to go right to an upfitter switch for the radio and that is generally fine to do. I did it this way because the 1000G requires a more heavy duty power draw and I wanted to minimize the potential interruptions.
image0 - Copy (3).jpeg
I plugged in the head unit to the cable, and powered the unit up to check. It worked, and nothing caught on fire, so success!
2023 Wildtrak. "Sometimes you got to get lost, to get found" -J Bronco
Deano Bronc, BroncOitis

Trusted and Carefree

Feb 04, 2023

#4
I thought a lot about the antenna, and where I wanted it to go. I thought about mounting in the rear, on the rear roll-bar, on the trail sight and on the cowl. I decided to go with the cowl, because it was the least conspicuous, but it may change latter. I used the antenna mount from @Mountains2Metal and a Laird quarterwave antenna. I also went with an NMO mount to give me the most options down the way.
image0.jpeg
This part was just a matter of undowing the bronco bolts...
image4.jpeg
...Poping up the cover...
image1.jpeg
... and running the cable through the gap.
image2.jpeg
There is a little space there that runs back into the inner fender and firewall and made it easy to run the antenna cable.

image3.jpeg
It was easiest to unscrew the NMO mount to run the cable...
image5.jpeg
...And put it back together with an English wrench.
2023 Wildtrak. "Sometimes you got to get lost, to get found" -J Bronco
Deano Bronc, BroncOitis

Trusted and Carefree

Feb 04, 2023

#5
I found it was easiest to position the antenna mount so the cable was pointing out to the side. that made everything work best.
image7.jpeg
It was just a matter of buttoning all that up and screwing the antenna into the mount. image6.jpeg
One of the things I really like about this mount, is that it possitions the antenna behind the A pil.lar when you are driving. It makes kinda disappear from the driver's field of vision
image8.jpeg
2023 Wildtrak. "Sometimes you got to get lost, to get found" -J Bronco
LoneRanger, Ditchrunner

Trusted and Carefree

Feb 04, 2023

#6
For the control unit, I considered putting it on a dash rail, but ultimately decided to mount it above the driver's visor.
image5 - Copy (3).jpeg
First, I popped down the lower dash panel and undid the grab handle
image6 - Copy (3).jpeg

image7 - Copy (2).jpeg
Then, unsing a trim tool, I carefully popped the airbag cover out
The cover is retained by a cord and a screw and I undid that and set it aside. I also loosened the lower airbag bolt to get a little wiggle room, but did not take all that out.
image9 - Copy (2).jpeg
Next, I took the curtain airbag cover off. It popped right off, after I took the two bolts out.
image8 - Copy (2).jpeg
Then I removed the latch cover. It pulls out from the bottom, but I squeezed the tabs on the top with a pair of plyers. Also- I did all this with the top flipped back, but you could do the same with the first row pannels out on the hardtop.
2023 Wildtrak. "Sometimes you got to get lost, to get found" -J Bronco
Deano Bronc, BroncOitis

Trusted and Carefree

Feb 04, 2023

#7
Next, I moved to the visor. I took off the retaining end first.
image4 - Copy (4).jpeg
There is a little cover that flips up on it, and it is held in place by one of these star screws.

The pivot side has a little trim cover that snaps over it. You need to pop that loose with a trim tool (be careful- this is the only piece I broke during this whole deal. It was pretty cold in the garage, so maybe it would be better when it was warmer, but if you are going to crack something, at least it is something that is hard to see.) Once it comes off, there is a hex screw holding on the visor, and it pulls back and down to come off. If you have power to the visor, there is a little plug to undo and then you can set it aside.
image6 - Copy (4).jpeg
Yep there is the crack.

After that the trim pieces just pop off. The bolt is on a little retaining clip and that fell out when I popped off the pannel, but it just slid back in.

image8 - Copy (3).jpeg
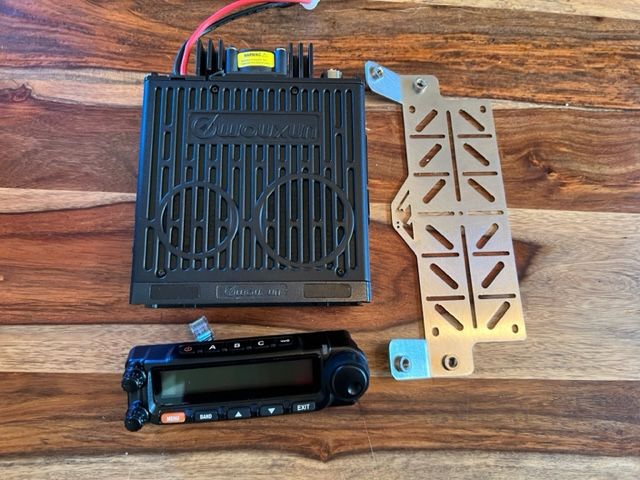
Okay, time to drill a hole in a brand new vehicle. The KG-1000G uses this mounting plate for the control unit. I zipped it on with some self-tapping screws and drilled out the cable passthrough. My drill marks will be covered by the unit.

image7 - Copy (3).jpeg
I ran the control cable up through the A pillar to the plate. There is all kinds of room to fish this cable through. Just be cognizant of the airbag and don't route the cable across it. Then its out the top and across the windshield trim to the backet.
image9 - Copy (3).jpeg

I buttoned everything back up- getting the visor back on was a real pain and took about 15 minutes of fiddling with it to get the best angle- and then plugged in the control unit. Its a CAT5 cable that plugs into the unit, and then the whole deal slides into the backet.
image10 - Copy.jpeg
2023 Wildtrak. "Sometimes you got to get lost, to get found" -J Bronco
magicrobots, Deano Bronc

Trusted and Carefree

Feb 04, 2023

#8
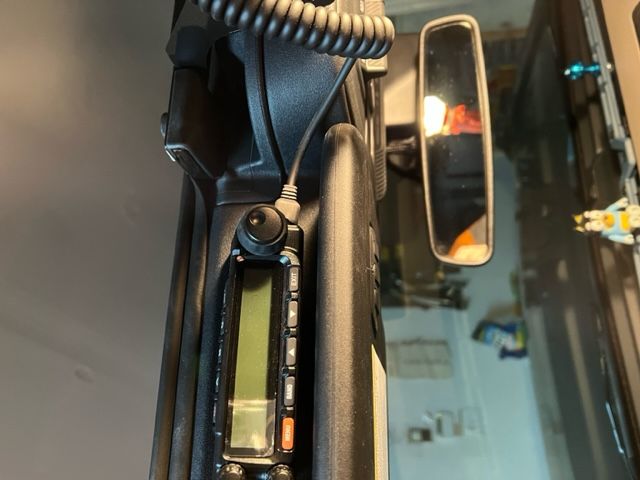
Once its all put back together, you end up with something like this:
image11 - Copy.jpeg
I did not put a mount in for the mic- I am using a @Mountains2Metal Squatch basket and right now I just have it sitting in there.
image12 - Copy.jpeg

On whole- I am very happy with this set up. It keeps everything out of the way, is easy to get to, and I can unplug the mic from the control unit and stow it if I want. If you aren't interested in drilling holes in your trim, It would be easy enough to put it on a rail or accessory point in the dash.

Anyway, thats how I did it. I have full function, and a good radio check. Later, I will put an SWR meter on this set up and maybe test it against some other antennas I have. It was a little unnerving tearing into a new vehicle, but the Bronco is very easy to do stuff like this with. Minnimal futzing about with everything. See you out there.👍
2023 Wildtrak. "Sometimes you got to get lost, to get found" -J Bronco
LoneRanger, Ditchrunner

Beers, Broncos, and Battlestar Galactica

Feb 04, 2023

#9
Great DIY project, @Mal. Love it! What kind of range do you get with this setup?
2023 Ford Bronco Badlands Sasquatch • 2-Door • Velocity Blue • 2.7L V6 • 10-Speed • Lux • Various Mods...
"True happiness is to enjoy the present, without anxious dependence upon the future." - SENECA
Ditchrunner, BroncOitis

Trusted and Carefree

Feb 04, 2023

#10
Great DIY project, @Mal. Love it! What kind of range do you get with this setup?
Quite a bit. I was able to hit our local repeater out north of 75 miles (but it is on the top of a 10K foot mountain with no obstructions so that's not a fair test). For what I want to do- trail coms, talking to a spotter and running with a group of cars, it will be more than enough. The real limiting factor on GMRS is line of sight, so I am really max range limited by what the terrain looks like. Me, on mountain talking to someone on a flat plane way below- lots of range. Me in a box canyon talking to a someone on the other side- probably not going to work.

Im not 100% sold on the quarter-wave antenna though. I ran a Nagoya 770G on my car and it was awesome, but it is also 38 inches and looks really weird on the bronco cowl. But I will play around with the SWR meter and see what everything looks like.
2023 Wildtrak. "Sometimes you got to get lost, to get found" -J Bronco
Deano Bronc, BroncOitis

Beers, Broncos, and Battlestar Galactica

Feb 04, 2023

#11
That's cool. From the looks of it, you left some options open for the final placement of components. You should have a better idea of where everything will go once you've had a chance to perform some real-world testing. Again, a very interesting and thoughtfully-executed DIY, sir!
2023 Ford Bronco Badlands Sasquatch • 2-Door • Velocity Blue • 2.7L V6 • 10-Speed • Lux • Various Mods...
"True happiness is to enjoy the present, without anxious dependence upon the future." - SENECA
magicrobots, Mal

Home again, Home again

Feb 04, 2023

#12
Really nice install… now i have to read up on GMRS radio, as I’m completely unfamiliar with it, and how it’s used…. I grew up in the land of CB‘s…
Riding OB1, 23 4- door Outer Banks, SAS, MOD, MIC, Lux, Ordered 10/20/22, delivered 1/13/23
Mal, Deano Bronc

🗻🏔️🏜️38°33'14.1"N 109°32'04.7"W🏜️🏔️🗻

Feb 04, 2023

#13
Hi Friends.

As one of the radio nerds around here, I wanted to put together a write up for my GMRS Radio installation. I got into GMRS from a discusion a couple years ago that was posted by BN OG @BuzzyBud. I ran an Midland 275 in my car for a while, and then when to a Radioddity DB-25G (that I really liked), but wanted to mount something with more functionality in the Bronco that wasn't going to sit in the middle of the dash.

I elected to go with a Wouxon KG-1000G radio, mainly because of the ability to remote mount the controls and stash the radio chassis somewhere else. We have an extensive repeater network here in New Mexico and the radio has a ton of slots to program, and it is 50 watts, which while overkill for what I needed, will be fine (Im of the opinion that any mobile radio north of say 15 watts is fine for trailcoms).

I have been using this radio as a basestation while I waited on my bronco, but now that it has arrived, It was time to put wire it in. I will break yo the install a few posts as it was a lot and post below.
Very nice install @Mal!
Lots of detail to your project and the how to instructions, very well covered pictures.
I have always had the hand held GMRS Radios and never really got into using the repeater.
All I have is the 128 channel BAOFENG G11S GMRS Radio, NOAA Weather Radio with FM frequency’s, repeater channels.
I wouldn’t even know how to set up the repeater channels, I just never really dug into it, however it would be nice to get the range with them.
What I hated doing was when I got my FCC License, what a fricken nightmare, I don’t know if it was just bad luck or what, but the constant running around to different sites and then back again, getting the FRN # not bad but taking that number to get the FCC license was a little more challenging, but to pay for the 10 year license….. “WOW” seems like every submit button I hit went no where, and then I’d be timed out and have to start again….
Anyhoo!
I’m just ranting, at least I’ve had it done now for a while.
Very well documented and
Congrats on a successful installation!
*632* Days to get A 2021 - 2022 -
2023 Big Bend - 2 Door 2.3L Velocity Blue, Squatched, Mid package, Running Boards, Roof Rack, and Engine Block heater.
Mal, Deano Bronc

Trusted and Carefree

Feb 05, 2023

#14
Really nice install… now i have to read up on GMRS radio, as I’m completely unfamiliar with it, and how it’s used…. I grew up in the land of CB‘s…
GMRS is kinda like CB crossed with HAM. You get much better range and clarity than CB, but its still much easier to get started than the amateur radio set ups. It really took off for the 4WD crowd when Jeep Jamboree switched over to GMRS.
2023 Wildtrak. "Sometimes you got to get lost, to get found" -J Bronco
Deano Bronc, BroncOitis

Trusted and Carefree

Feb 05, 2023

#15
Very nice install @Mal!
Lots of detail to your project and the how to instructions, very well covered pictures.
I have always had the hand held GMRS Radios and never really got into using the repeater.
All I have is the 128 channel BAOFENG G11S GMRS Radio, NOAA Weather Radio with FM frequency’s, repeater channels.
I wouldn’t even know how to set up the repeater channels, I just never really dug into it, however it would be nice to get the range with them.
What I hated doing was when I got my FCC License, what a fricken nightmare, I don’t know if it was just bad luck or what, but the constant running around to different sites and then back again, getting the FRN # not bad but taking that number to get the FCC license was a little more challenging, but to pay for the 10 year license….. “WOW” seems like every submit button I hit went no where, and then I’d be timed out and have to start again….
Anyhoo!
I’m just ranting, at least I’ve had it done now for a while.
Very well documented and
Congrats on a successful installation!
Yeah that FCC website is a challenge. Glad its only a once a decade thing.

The repeater stuff is cool, but its definitely a nice to have, not a need to have. I got into that part of it mainly because I wanted to learn more about how RF stuff worked. But I am a big nerd and thats just how I do it. :geek:

I like the Mygmrs site for repeater access. It can help with all the access codes and whatnot for your area.
2023 Wildtrak. "Sometimes you got to get lost, to get found" -J Bronco
BroncOitis

Slickrock withdraws

Feb 05, 2023

#16
Isn't that face now going to be a projectile with an airbag (heaven forbid) deployment? Overall sweet install.
2 Dr BL MGV High 2.3 Auto SAS MIC Tow....
7/13/20 res 1/21/21 order
Got my VIN 9/30.....Build week 11/15 Delivered 1/14/22
BroncOitis

Home again, Home again

Feb 05, 2023

#17
Isn't that face now going to be a projectile with an airbag (heaven forbid) deployment? Overall sweet install.
Wait, there is an airbag above the visor? THAT was something I didn’t know…. Side airbags above the windows but was unaware of anything forward above the cockpit…
Riding OB1, 23 4- door Outer Banks, SAS, MOD, MIC, Lux, Ordered 10/20/22, delivered 1/13/23
BroncOitis

🗻🏔️🏜️38°33'14.1"N 109°32'04.7"W🏜️🏔️🗻

Feb 05, 2023

#18
Isn't that face now going to be a projectile with an airbag (heaven forbid) deployment? Overall sweet install.
I don't believe they put airbags up above the head except for the side curtains, because it would be a safety issue, when going forward the only airbag would be in the steering wheel.
I can't imagine having an airbag coming down at you from the front, that could and most likely would snap your neck.....
*632* Days to get A 2021 - 2022 -
2023 Big Bend - 2 Door 2.3L Velocity Blue, Squatched, Mid package, Running Boards, Roof Rack, and Engine Block heater.
Bluestreak57

Slickrock withdraws

Feb 05, 2023

#19
I don't believe they put airbags up above the head except for the side curtains, because it would be a safety issue, when going forward the only airbag would be in the steering wheel.
I can't imagine having an airbag coming down at you from the front, that could and most likely would snap your neck.....

I was just thinking out loud before being fully caffeinated.....Makes sense to not be there. Fist rig I've ever had with airbags...We always wrecked like real men without them. My bad. Carry on. Nothing to read here!
2 Dr BL MGV High 2.3 Auto SAS MIC Tow....
7/13/20 res 1/21/21 order
Got my VIN 9/30.....Build week 11/15 Delivered 1/14/22
Xpathf1nderX, EGBronc

You must log in or register to post here.