How to Use the Auxiliary Switches on your Bronco

Bronco
Mar 05, 2021
8

One of the things that Ford loves to talk about when discussing the Bronco is modularity. To Ford, customization with minimal effort is one of the central reasons to buy their new open air 4x4. Our new How-to video, debuting tonight, will cover how to customize your Bronco by using your pre-run wiring and auxiliary switches to accessories.

What are the auxiliary switches for?

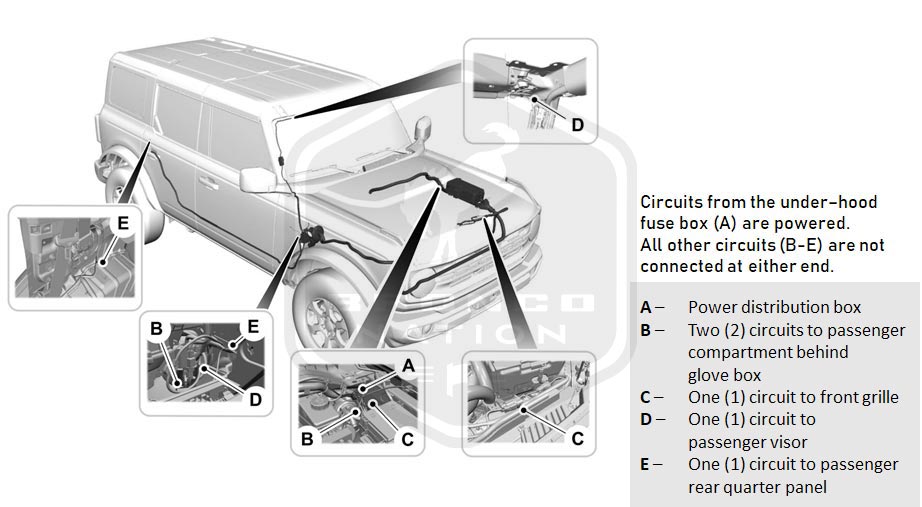
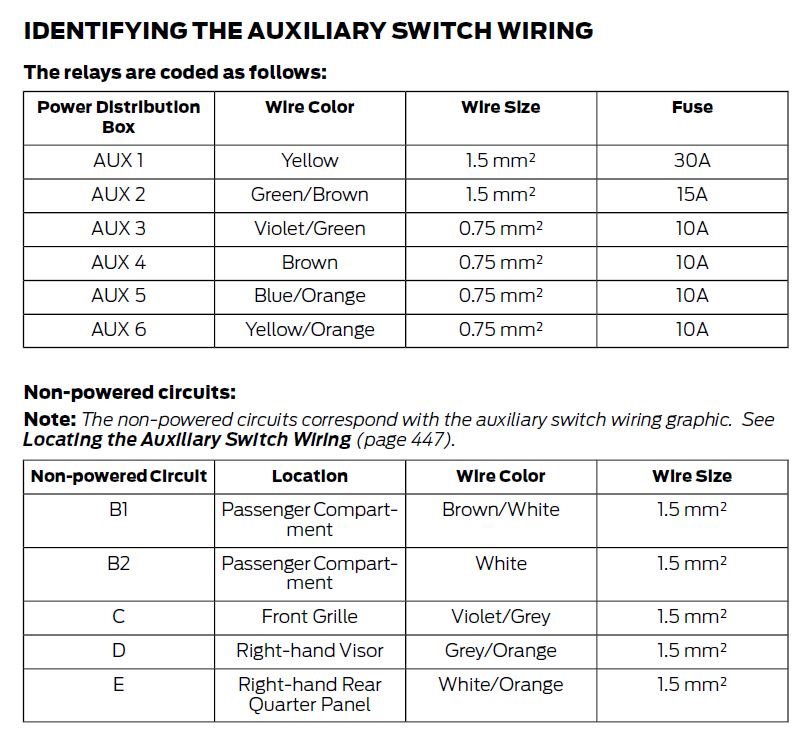
The auxiliary switches, AUX1 through AUX6, make aftermarket customization easier. Six prewired switches connected to the power distribution box of your Bronco allow you to control light bars, pod lights, or an in-Bronco refrigerator. The new Bronco has pre-run wiring in those hard-to-reach places that reduces the amount of tear down required when installing accessories. All you have to do is connect the right circuits together. Furthermore, the places that you’re connecting wires are in easy to reach locations. Newer vehicles, including Bronco, make it difficult to tie into the wiring harness but this feature allows DIY builders to customize their Broncos without warning lights and error codes flashing at them for their efforts.

Where are the auxiliary switches?

Auxiliary switches are standard on Wildtrak, First Edition, Badlands, and Black Diamond Broncos and an option on Base, Big Bend, and Outer Banks. If your Bronco is equipped with them, they’ll be located above the rear-view mirror.

How do I use the aux switches in my Bronco?

Well, once they’re wired up, you just flip the switch in order to power the accessory that you’ve assigned to that switch. When engaged, the switches will illuminate. The power will be coming from the battery so it’s best to have the engine running when using accessories so that you don’t come back to a dead battery.

How do I wire up the aux switches to an accessory?

Step 1: Get Your Tools

While some Bronco customizations are easy even for novices, wiring up the Aux switches is a step or two above those in difficulty. You’ll need a few things.

Tools you’ll need:

  • Crimper
  • Heat Gun
  • Wire shrink wire connectors
  • Drill and appropriate drill bit. (if using the windshield circuit)

Step 2: Identify the aux switch you want to use.

Now you need to identify which switch you want to use. Check your accessory’s documentation to ensure that you’re connecting it to a switch that is appropriate for the accessory’s needs. Refer to the chart below more information. Pay attention to the amp draw for the switch that you’re selecting. Those ratings are your power budget and if you put an accessory that draws 5A on a switch that is rated for 25A then you’ve just wasted 20A. For example, this Rigid Pod light draws 2A and is a good fit for switches AUX 4-6 but you’d be wasting your budget if you put it on AUX 1-3.

Step 3: Identify the circuit that runs to where you’re installing your accessory.

There are five circuits that run to key places on the Bronco that are likely to have accessories mounted. These are where you can easily mount accessories often with Bronco bolts available for mounting. Identify the circuit that is running to the install desired location on your Bronco.

Here are the locations:

  • 1X to the front grille
  • 2X to the passenger compartment behind the glove box
  • 1X to the passenger windshield above the passenger visor
  • 1X to the passenger rear quarter panel

Step 4: Get the power to where you need it.

At a basic level, wiring is about moving power to where you need it. You’re connecting a stream of electricity to your accessory. You’ll need to identify the right wires that will create that stream. Our video guide will show an example of how this works.

Once you have those wires connected, you can then wire up your accessory and power will flow to where you need it when the appropriate aux switch is engaged. Turn on your Bronco and flip the switch. Check to make sure that your accessory is working as intended.

What are you going to connect to your auxiliary switches? Let us know in our forum poll.

An earlier version of this article featured pre-production technical information from Ford Motor Company. Final production specifications have been updated as of Jan 2022.

Comments

You must log in or register to post here.