How to Use the Auxiliary Switches in Your Bronco

David
Mar 05, 2021

Rank VI

Mar 05, 2021

*UPDATED WITH CURRENT SPECS FROM USER MANUAL*

https://community.thebronconation.com/how-to-use-the-auxiliary-switches-on-your-bronco/
One of the things that Ford loves to talk about when discussing the Bronco is modularity. To Ford, customization with minimal effort is one of the central reasons to buy their new open air 4×4. Our new How-to video, debuting tonight, will cover how to customize your Bronco by using your pre-run wiring and auxiliary switches to accessories.


What are the auxiliary switches for?
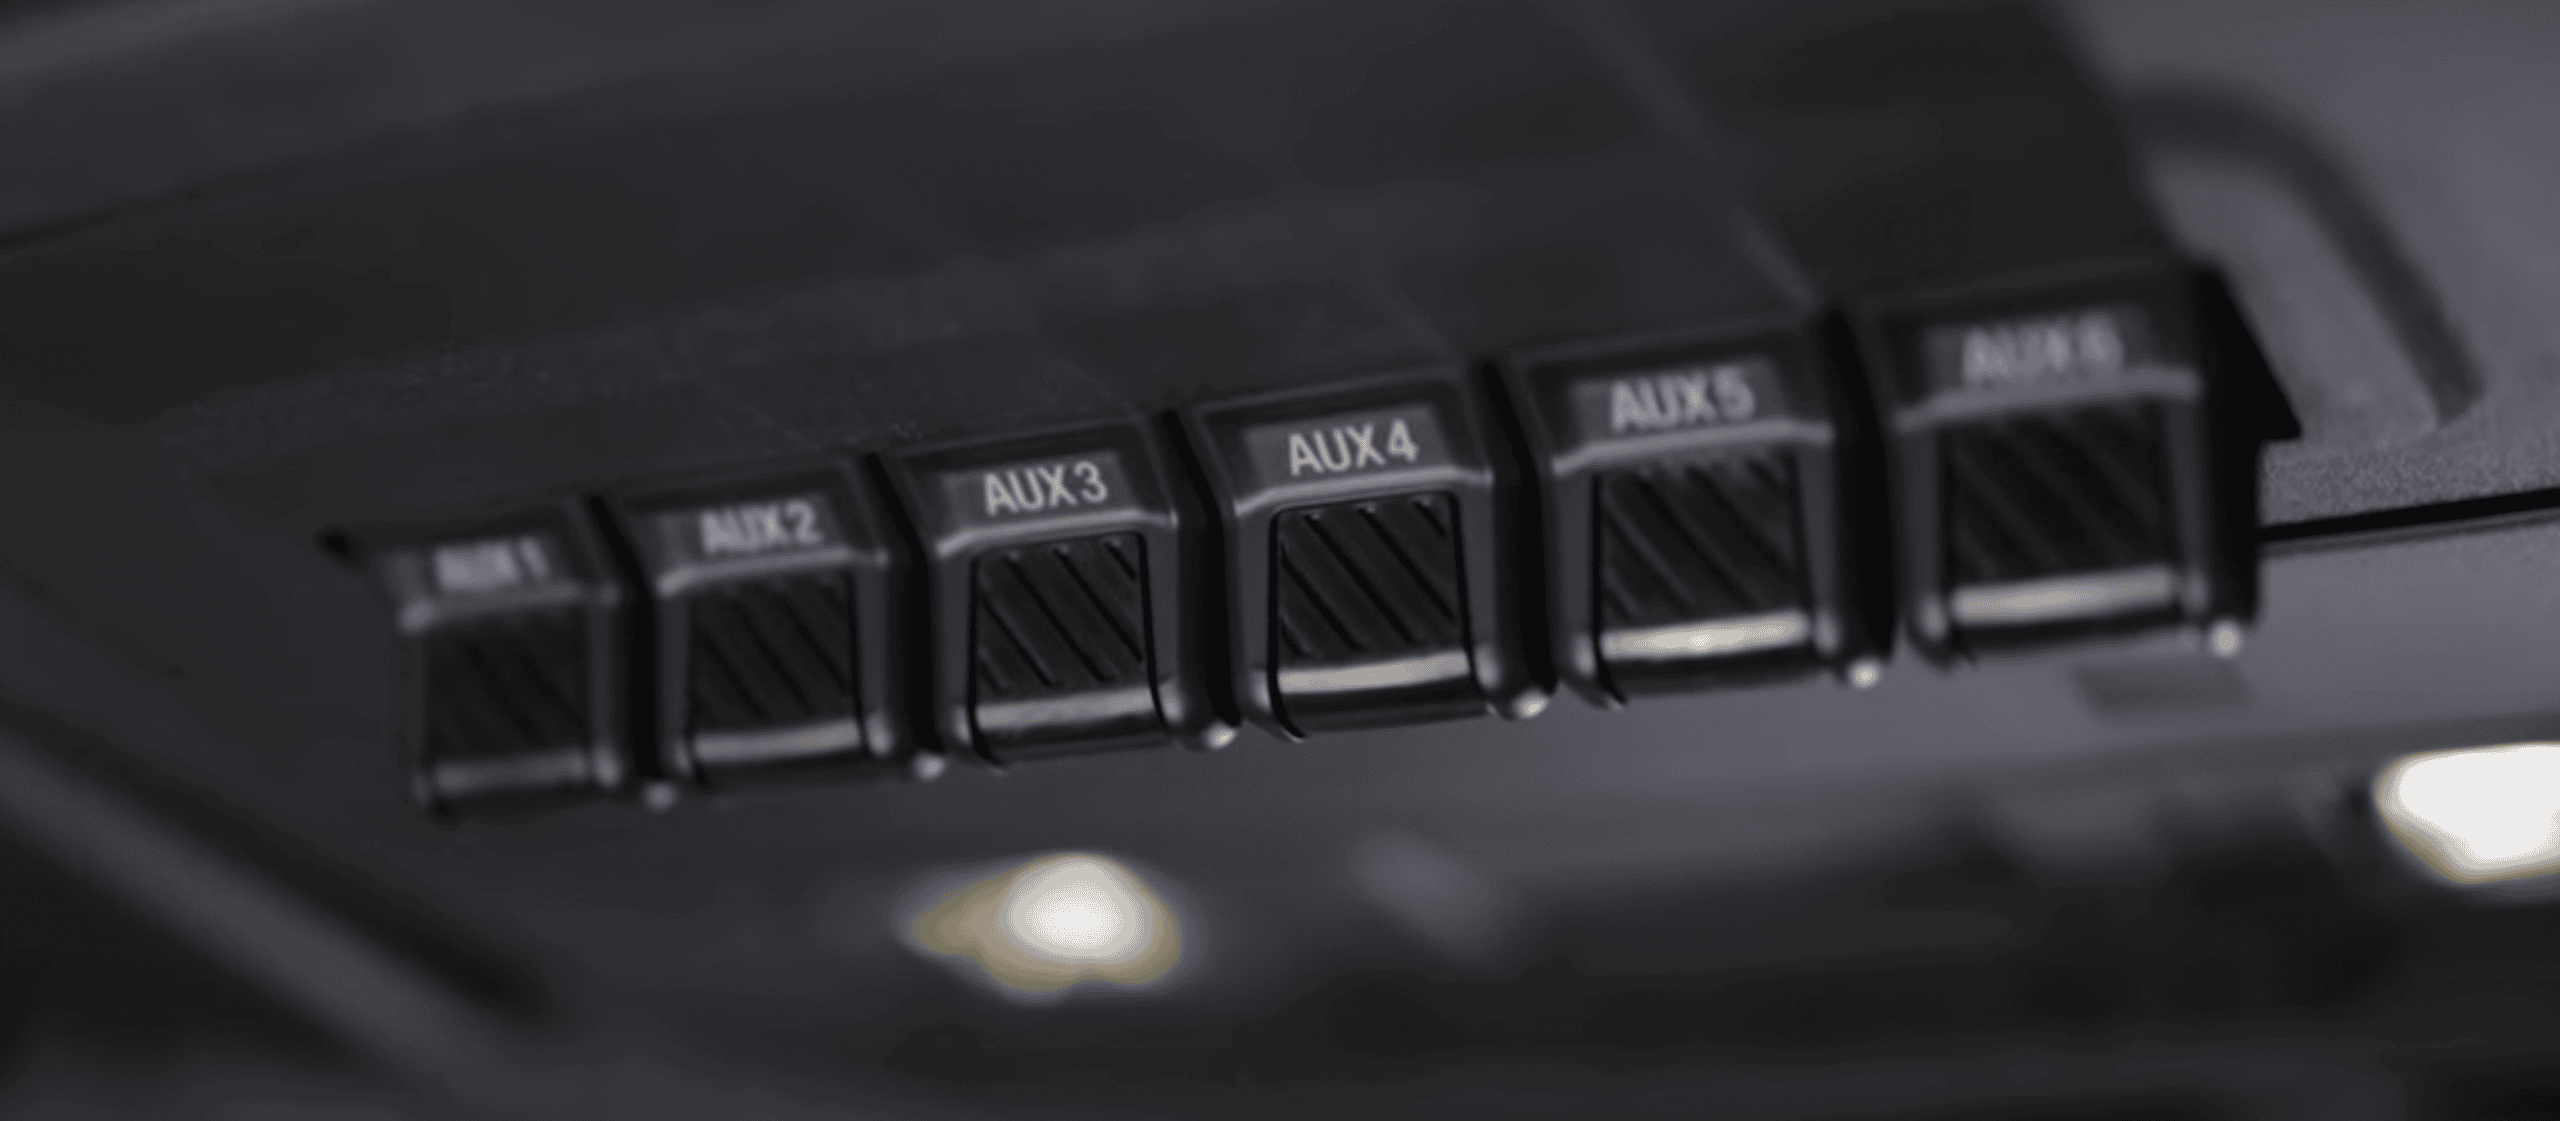
The auxiliary switches, AUX1 through AUX6, make aftermarket customization easier. Six prewired switches connected to the power distribution box of your Bronco allow you to control light bars, pod lights, or an in-Bronco refrigerator. The new Bronco has pre-run wiring in those hard-to-reach places that reduces the amount of tear down required when installing accessories. All you have to do is connect the right circuits together. Furthermore, the places that you’re connecting wires are in easy to reach locations. Newer vehicles, including Bronco, make it difficult to tie into the wiring harness but this feature allows DIY builders to customize their Broncos without warning lights and error codes flashing at them for their efforts.
Where are the auxiliary switches?
Auxiliary switches are standard on Wildtrak, First Edition, Badlands, and Black Diamond Broncos and an option on Base, Big Bend, and Outer Banks. If your Bronco is equipped with them, they’ll be located above the rear-view mirror.
How do I use the aux switches in my Bronco?
Well, once they’re wired up, you just flip the switch in order to power the accessory that you’ve assigned to that switch. When engaged, the switches will illuminate. The power will be coming from the battery so it’s best to have the engine running when using accessories so that you don’t come back to a dead battery.
How do I wire up the aux switches to an accessory?
Step 1: Get Your Tools
While some Bronco customizations are easy even for novices, wiring up the Aux switches is a step or two above those in difficulty. You’ll need a few things.
Tools you’ll need:
  • Crimper
  • Heat Gun
  • Wire shrink wire connectors
  • Drill and appropriate drill bit. (if using the windshield circuit)
Step 2: Identify the aux switch you want to use.
Now you need to identify which switch you want to use. Check your accessory’s documentation to ensure that you’re connecting it to a switch that is appropriate for the accessory’s needs. Refer to the chart below more information. Pay attention to the amp draw for the switch that you’re selecting. Those ratings are your power budget and if you put an accessory that draws 5A on a switch that is rated for 25A then you’ve just wasted 20A. For example, this Rigid Pod light draws 2A and is a good fit for switches AUX 4-6 but you’d be wasting your budget if you put it on AUX 1-3.

Step 3: Identify the circuit that runs to where you’re installing your accessory.

There are five circuits that run to key places on the Bronco that are likely to have accessories mounted. These are where you can easily mount accessories often with Bronco bolts available for mounting. Identify the circuit that is running to the install desired location on your Bronco.
Here are the locations:
  • 1X to the front grille
  • 2X to the passenger compartment behind the glove box
  • 1X to the passenger windshield above the passenger visor
  • 1X to the passenger rear quarter panel

Step 4: Get the power to where you need it.
At a basic level, wiring is about moving power to where you need it. You’re connecting a stream of electricity to your accessory. You’ll need to identify the right wires that will create that stream. Our video guide will show an example of how this works.
Once you have those wires connected, you can then wire up your accessory and power will flow to where you need it when the appropriate aux switch is engaged. Turn on your Bronco and flip the switch. Check to make sure that your accessory is working as intended.
What are you going to connect to your auxiliary switches? Let us know in our forum poll.

Bronco Aux Switch Ratings.JPG


PREVIOUS Bronco Badging with BadXBronco and Utah.Bronco
Bronco Nation Member #144
David in the Bronco Nation Forums
BroncoTroubadour on Instagram
KenM, Crawler Green

Rank V

Mar 07, 2021

#60
I totally forgot about these connectors. For all those who dont want to use a crimper tool and want to keep things flexible for the future these are the best alternative I can think of to a terminal block. Dont do that you will end up drilling down the terminal block somewhere and I found I always regret the permanence of them and there ugly look. These Wago crimp nuts are not waterproof but that should not be an issue. Just lift the orange lever, slip in one wire and close the lever, then lift the other lever and put the other wire in there and close the second lever. boom, now you have a connection that can handle the 25A max offered and have the adjustability for the future. these are also great when daisy chaining as you can get ones with more than 2 positions. I also love them for tight spots like we saw behind the glove box.

1615131581879.png

https://www.newark.com/wago/221-412/terminal-block-pluggable-2pos/dp/71Y8326#
TCopp, ATC Enthusiast

Rank VI

Mar 07, 2021

#61
...or the corners of the bumpers where one of the vehicles had pod lights , or .....

There are several places Ford gives you to mount lights or other accessories . No one ever said they would all be pre-wired for you .
Can't we just be happy that for $195 they are giving us the option for 6 AUX switches in a nice overhead enclosure that are all "pre-wired " to a under hood PDP , already factory fused and relayed ?
I'm just noting this for discussion. Im not upset by no means. The front bumper lights are powered by the wire going to the grill I was assuming. Also assuming that one of the 2 going behind the glovebox might be used for that.
2021 4 door Badlands Sasquatch, Rapid red. 2.7, high package. Reserved on 07-19-2020, ordered 01-20-2021, delivered 12-05-2021
Rydfree

Don't Follow Me ,I'm about to do something Stupid

Mar 07, 2021

#62
I totally forgot about these connectors. For all those who dont want to use a crimper tool and want to keep things flexible for the future these are the best alternative I can think of to a terminal block. Dont do that you will end up drilling down the terminal block somewhere and I found I always regret the permanence of them and there ugly look. These Wago crimp nuts are not waterproof but that should not be an issue. Just lift the orange lever, slip in one wire and close the lever, then lift the other lever and put the other wire in there and close the second lever. boom, now you have a connection that can handle the 25A max offered and have the adjustability for the future. these are also great when daisy chaining as you can get ones with more than 2 positions. I also love them for tight spots like we saw behind the glove box.

View attachment 9805

https://www.newark.com/wago/221-412/terminal-block-pluggable-2pos/dp/71Y8326#

Yep those are great . You can pick up small batches of them on Amazon pretty reasonable .
2Dr Badlands - MIC - Area51 - 2.7 Auto - MGV - Headliner - High Pkg
Reserved 7/20/20 Delivered 5/6/23
"Ford said, hey we're gonna fulfill all reservations and pre-orders before we build stock units."
Bschurr

Rank V

Mar 07, 2021

#63
I totally forgot about these connectors. For all those who dont want to use a crimper tool and want to keep things flexible for the future these are the best alternative I can think of to a terminal block. Dont do that you will end up drilling down the terminal block somewhere and I found I always regret the permanence of them and there ugly look. These Wago crimp nuts are not waterproof but that should not be an issue. Just lift the orange lever, slip in one wire and close the lever, then lift the other lever and put the other wire in there and close the second lever. boom, now you have a connection that can handle the 25A max offered and have the adjustability for the future. these are also great when daisy chaining as you can get ones with more than 2 positions. I also love them for tight spots like we saw behind the glove box.

View attachment 9805

https://www.newark.com/wago/221-412/terminal-block-pluggable-2pos/dp/71Y8326#

Another great option that is more compact than the Wago is the Posi-Lock.

https://www.posi-products.com/posilock.html
1615132272626.jpeg
For me I’ll just use marine quality butt connectors or waterproof disconnect plugs, depending on the situation.

ATC Enthusiast, Deano Bronc

Rank V

Mar 07, 2021

#64
Another great option that is more compact than the Wago is the Posi-Lock.

https://www.posi-products.com/posilock.html
View attachment 9806View attachment 9806View attachment 9806
Those are interesting. I think those are an option for if I want a T junction but not for end to end. I dont like the way they flare out the strands around the cone, its an inverse wire nut.

Rank V

Mar 07, 2021

#65
Those are interesting. I think those are an option for if I want a T junction but not for end to end. I dont like the way they flare out the strands around the cone, its an inverse wire nut.

Flaring out the strands increases the surface area insuring both a better connection and stronger hold. Wire nuts work by twisting the strands. Post-locks are compact and highly regarded. The only drawback is that they are not waterproof so use accordingly.
Deano Bronc, TorgSurv

Rank V

Mar 07, 2021

#66
Flaring out the strands increases the surface area insuring both a better connection and stronger hold. Wire nuts work by twisting the strands. Post-locks are compact and highly regarded. The only drawback is that they are not waterproof so use accordingly.
I like the connector type. its a great alternative. Having not used them before I dont know the issues that happen when moving wires from one circuit to another.` Having used the Wago I know them (go with what you know mentality). Flaring out bends the strands and makes me feel like moving it will cause issues for my future self. bending strands repeatedly is something to avoid when possible as you know. How do they perform the second time you try and put them in the connector? Do you need to smooth out the strands to fit them through the barrel or can they keep the shape?

I know myself, I change my mind over time. For me, firm crimped connectors are the way to go. for others, the tool-less options like the Wago or Posi will be the choice to make. I wonder if I should get some of these connectors for my off road kit?

Rank V

Mar 07, 2021

#67
I like the connector type. its a great alternative. Having not used them before I dont know the issues that happen when moving wires from one circuit to another.` Having used the Wago I know them (go with what you know mentality). Flaring out bends the strands and makes me feel like moving it will cause issues for my future self. bending strands repeatedly is something to avoid when possible as you know. How do they perform the second time you try and put them in the connector? Do you need to smooth out the strands to fit them through the barrel or can they keep the shape?

I know myself, I change my mind over time. For me, firm crimped connectors are the way to go. for others, the tool-less options like the Wago or Posi will be the choice to make. I wonder if I should get some of these connectors for my off road kit?

They are small and can't hurt to have in the kit.
ATC Enthusiast, Rhiostatic

Team F Cancer!!

Mar 07, 2021

#68
I just realized that the wiring diagram doesn't show wires going to the mirror brackets for pod lights. That was another one of the advertised features.
I was thinking that too but if you look at whats pre-wired it (outside the grill) it's all ran inside the truck (hardest spots IMO). So, after thinking about it, it would seem pretty easy to decide which switch I wanted the Pods on and run the wire to the box already waiting in the engine compartment
WT HOSS 4dr 2.7 MIC Lux Tow
7/16/20 Res -- 1/22/21, 10/8/21 Order -- 3/24/22 VIN -- 5/9/22, 5/23/22, 5/16/22, 6/6/22, 6/17/22 Build 7/15/22 Delivered
Deano Bronc

Rank V

Mar 07, 2021

#69
I was thinking that too but if you look at whats pre-wired it (outside the grill) it's all ran inside the truck (hardest spots IMO). So, after thinking about it, it would seem pretty easy to decide which switch I wanted the Pods on and run the wire to the box already waiting in the engine compartment

That depends on how hard it will be to get wires into the mirror arms. I suspect it will be relatively easy as there will be wires already going there for the power mirrors. Considering the lights will have their own wires you just fish them down the hole and out into the engine compartment. At that point you're most of the way there.
Deano Bronc

Team F Cancer!!

Mar 07, 2021

#70
That depends on how hard it will be to get wires into the mirror arms. I suspect it will be relatively easy as there will be wires already going there for the power mirrors. Considering the lights will have their own wires you just fish them down the hole and out into the engine compartment. At that point you're most of the way there.
From pictures (i think KOH) with them mounted basically at the A pillar its simply ran down into the hood but that was also pre-production models too. My guess as you would have to have some sort of access point to access the hardware to tighten from inside. Or that is my guess on it
WT HOSS 4dr 2.7 MIC Lux Tow
7/16/20 Res -- 1/22/21, 10/8/21 Order -- 3/24/22 VIN -- 5/9/22, 5/23/22, 5/16/22, 6/6/22, 6/17/22 Build 7/15/22 Delivered
swooshdave

Rank V

Mar 07, 2021

#71
Maybe BroncoNation could make a video on them. :cool:
ResidualGenius

Team F Cancer!!

Mar 07, 2021

#72
Maybe BroncoNation could make a video on them. :cool:
Agreed there! Or a little addition since they already did the Aux switches
@David hint hint LOL
WT HOSS 4dr 2.7 MIC Lux Tow
7/16/20 Res -- 1/22/21, 10/8/21 Order -- 3/24/22 VIN -- 5/9/22, 5/23/22, 5/16/22, 6/6/22, 6/17/22 Build 7/15/22 Delivered
swooshdave

Don't Follow Me ,I'm about to do something Stupid

Mar 07, 2021

#73
From pictures (i think KOH) with them mounted basically at the A pillar its simply ran down into the hood but that was also pre-production models too. My guess as you would have to have some sort of access point to access the hardware to tighten from inside. Or that is my guess on it
The bolt and wires will be accessible easily from the rear corner of the fender . That's why Ford calls it an ACCESSory point :)

pod.png
2021-bronco-2-3l-engine-compartment-1-jpg.jpg
2Dr Badlands - MIC - Area51 - 2.7 Auto - MGV - Headliner - High Pkg
Reserved 7/20/20 Delivered 5/6/23
"Ford said, hey we're gonna fulfill all reservations and pre-orders before we build stock units."
KennyMac, ATC Enthusiast

Team F Cancer!!

Mar 07, 2021

#74
From pictures (i think KOH) with them mounted basically at the A pillar its simply ran down into the hood but that was also pre-production models too. My guess as you would have to have some sort of access point to access the hardware to tighten from inside. Or that is my guess on it
The bolt and wires will be accessible easily from the rear corner of the fender . That's why Ford calls it an ACCESSory point :)
Not the pics I’ve seen but decent still and easy to run over to the box
WT HOSS 4dr 2.7 MIC Lux Tow
7/16/20 Res -- 1/22/21, 10/8/21 Order -- 3/24/22 VIN -- 5/9/22, 5/23/22, 5/16/22, 6/6/22, 6/17/22 Build 7/15/22 Delivered
OBXBroncoGuy

Mar 08, 2021

#75
still want donut door as an accessory! is there a poll on that?? but am glad that i chose to get switches
KennyMac, ResidualGenius

Team F Cancer!!

Mar 08, 2021

#76
still want donut door as an accessory! is there a poll on that?? but am glad that i chose to get switches
I think there was but it’s an AM part
WT HOSS 4dr 2.7 MIC Lux Tow
7/16/20 Res -- 1/22/21, 10/8/21 Order -- 3/24/22 VIN -- 5/9/22, 5/23/22, 5/16/22, 6/6/22, 6/17/22 Build 7/15/22 Delivered

you can tune a guitar but can't tune a fish

Mar 08, 2021

#77
Saw these on one of those Saturday morning DIY truck /car shows.

Joined May 29, 2020 Member 546
⠀⠀⠀⠀⠀⠀⠀⠀⠀⠀⠀⠀⠀⠀⠀⠀⠀⠀⠀⠀⠀​
KennyMac, ATC Enthusiast
OBXBroncoGuy

Mar 08, 2021

#78
I think there was but it’s an AM part
you sure its a AM? Was just reading online that it was a prototype and ford decided not to do it. I hope what i read is wrong

Team F Cancer!!

Mar 08, 2021

#79
I think there was but it’s an AM part
you sure its a AM? Was just reading online that it was a prototype and ford decided not to do it. I hope what i read is wrong

It was on the black and gold build. Thought those were AM. If not I’d bet they will be on the market soon
WT HOSS 4dr 2.7 MIC Lux Tow
7/16/20 Res -- 1/22/21, 10/8/21 Order -- 3/24/22 VIN -- 5/9/22, 5/23/22, 5/16/22, 6/6/22, 6/17/22 Build 7/15/22 Delivered

You must log in or register to post here.