
Jan 24, 2026
So I had an opportunity over the past week or so to put my Wolfbox G900 TriPro thru its paces and the verdict is in! Here is my detailed review and install video - mind you it is my first install video so apologies for the format but I figured a playlist with table of contents was easier than trying to fast forward to specific areas.
1. Introduction
Best dash cam option for my Bronco Raptor
I was pretty stoked when the guys at Wolfbox asked me to do this review of the new Tripro G900.
I've never done a full-blown DIY install and review. At least not on video, but many of you have seen a lot of my DIY installs like my ARB compressor, revamp of my audio system and my KC Hilites Cyclone rock lights and A-pillar lights.
This is a new one for me – so don’t expect much from my video skills.
2. Unboxing: First Impressions
Packaging, What’s in the Box and Initial Aesthetics:
Let's start with the packaging. Really, really, nice packaging it’s compact, great design on the outside and as you open it up and unbox you see that they put a lot of thought into compartmentalizing and identifying the contents with some visual aids as well as text. This becomes critically important down the road because I read some horror stories of guys taking everything out of the box, not looking at it and then incorrectly swapping the rear camera for the extra camera that goes in front and they have a different connector. The rear camera being a 2.5k camera has a USB-C, with an added red lead to tap into the reverse lights should you choose to have the mirror function in that capacity. The extra front 1080p camera has a simple mini jack (headphone style jack). So if you go to the effort of running all those wires and get to the point where you're going to plug it in, you may be very disappointed to find out you've mixed those two up, but like I said the individual component boxes inside the main box do a really good job of identifying those so that you can be sure to set up properly.
The trim removal tool that they give you is good for tucking wires up around the headliner but that’s about it - more on that later. Since you're going to take apart your rear quarter panel cargo area, I would highly recommend getting a bigger more proper trim removal tool or a set off Amazon. There are a lot of fasteners back there and there is a particular section that I will go through in one of the videos that tends to break off... Ask me how I know – refer to last year’s subwoofer install pics.
3. Installation & Physical Setup
So what’s the install process look like?
Installation for most Broncos and Bronco Raptors will be pretty straightforward. Remove the right side cargo panel. Unless like me, you have a slide out tailgate or some other enclosure you'll need to remove that first. You don't need to fully remove any of the B-pillar trim. You'll also see in the video/pics that I was able to snake a wire underneath with just a skinny fiberglass snake and pull that through. That B-pillar trim is a bit of a bitch because it's got the seat belt mechanism and all that, so I’d try and avoid pulling that apart if possible. Pulling out some of the lower A-pillar trim at the very bottom is needed near the kick panel speaker cover and will help you get that wire up around the top near the dash – you’ll have to remove any OEM grab handles as well to give you some room to navigate between the dash and A-pillar, and then using the provided or your own trim panel tool you can tuck that wire down so that it sits between the dash and the A-pillar trim without having to remove it. Then you can tuck it between the A-pillar trim and the windshield again without having to remove it – I tried to avoid all that because – you know – airbags and stuff.
Putting the OEM mounting bracket onto the Wolfbox mirror itself is pretty straightforward. You remove the four rubberized covers hiding the screws and j-shaped clips that the rubber straps would attach to. And then once you remove the screws make sure you save them, you're going to need them again. Flip the mirror over, the little rectangular inserts that hold the j-clips in place will fall out and then you'll be able to remove the j-clips. Then take your OEM mount bracket, put it in place. Make sure it's facing the proper direction and insert the 4 previously used screws and tighten, do not and I can't stress this enough, over-tighten. You can just put two fingers on your screwdriver and lightly twist them till they are essentially finger tight. You don't need to torque them down like crazy or you will rip the nutserts out of the plastic bracket.
I ran the rear camera down the passenger side and the front (extra) camera gets run down the driver’s side A-pillar and through the firewall. The GPS sensor I mounted to the left of the mirror on the dotted/shaded part near the center of the windshield at the top – there’s A LOT of extra slack there you need to hide.
There's a couple of ways to power up the mirror. One is via the included hardwire kit that will take you down the driver side A-pillar to the fuse box, or down the passenger side A-pillar and then across the back of the center console to the fuse box. I opted not to do that. I don't like having piggyback type connectors in my fuse panel and I was not planning on operating my dash cam in sentry mode. Instead, I used a Dongar adapter to connect directly to my factory mirror connector with a USB-C dongle to power the Wolfbox. The plastic trim cover over the windshield-mounted mirror and electronics does not have a lot of extra room in it. I know there are some guys that were able to stuff all the excess wiring in there with the Dongar adapter - I was having a tough time doing that, so I left the USB-C portion outside of the trim cover and the connector portion inside the trim cover.
Eventually, my plan in the spring when it's a little warmer, is to remove my roof panels and ultimately embark on the troublesome journey of removing the visors, both sides of the A-pillar trim and the header center console where my auxiliary switches are housed. That should enable me to clean up all that excess wiring, get it buried up in that header trim and eliminate my OCD twitches looking at the Dongar adapter and wiring that's there currently. It’s not bad – but I know it’s there whether or not I can actually see it in my line of sight (I can’t but it still bothers me – yeah I know, I have issues). I also plan on using some flat right angle USB-C adapters that will work with this setup. I'll provide an update here on this thread when that happens.
Getting the front camera set up is pretty straightforward also. Similar process as the rear. Find out where you want to mount it. I put mine dead center of my bumper directly below my Ford 360 camera using the two-sided tape that came with the wolf box. Also forgot to mention before, the fact that the cameras are set up with a separate little pigtail (the parts you want to waterproof) and you can run the wiring with just a connector separately works very nicely to be able to thread it through tight areas. One thing I haven't done yet, but I will add a little dielectric grease inside the connector to further waterproof and I will cover the connection point with waterproof sealing heat shrink tubing – (again I have issues – refer to ARB compressor wiring and stitching I did on a HDPE board with zip ties).
To get the front camera wire into the engine bay and front bumper area, simply locate the large grommet at the firewall and make a slight hole (mine was already there from other wires passed thru) and thread that through, it will come out right where your aux wires are. Getting that wire to the front bumper without taking the grill off is worth the extra time to thread it versus pulling more components apart in my view, I was able to drop it down near the back of the headlight and pull it out right at where the rubber gasket meets the chin valance just above the front bumper.
Once all those wires are tucked away neatly you can connect everything, mount the Wolfbox mirror on the OEM mount that is attached to the windshield and tighten that up.
One thing I was warned about with the Wolfbox (even by the Wolfbox team also) is that you will not be able to use your visors because of the added width compared to the stock OEM mirror. I am happy to report that that is not necessarily the case. The mirror mount articulates at the windshield end as well as directly behind the mirror, similar to the OEM mount and it allows you enough flexibility to shift the mirror to be dead center with a slight tilt towards the driver/ This allows you to use your visors with them ever so slightly touching the mirror as you push them forward – and let’s face it, there isn’t a whole lot of height to the windshield so the visors would block your view anyway – I only use them to lock my sunshield in place when I park which again – top off most of the spring / summer, so irrelevant.
4. Software & Configuration
Once in the app you can view and download/save video clips – haven’t figured out how to download them outside of the app yet or if that’s even possible.
5. Performance: Does it Work?
Now that it’s set up, how does it actually perform?
High build quality
Intuitive app interface
Great visibility, even at night
Automatic recording and storage
Easy installation process
Cons:
Gotta bury a decent amount of excess cable
A lot of info on the screen all at once (but configurable)
If sun is directly behind you, the camera gets washed out
Can’t look in the mirror to see what’s happening in back seat or cargo area
Trim removal tool is more of a wire tucking tool
6. The Verdict
Here is the youtube link - I have a few videos from the Wolfbox itself being added to the playlist (or maybe I'll leave them separate) - but they are uploading now and I wanted to get this posted before this Armageddon snow storm in the Northeast.
1. Introduction
Best dash cam option for my Bronco Raptor
- Why did I need a dash cam for my Bronco Raptor?
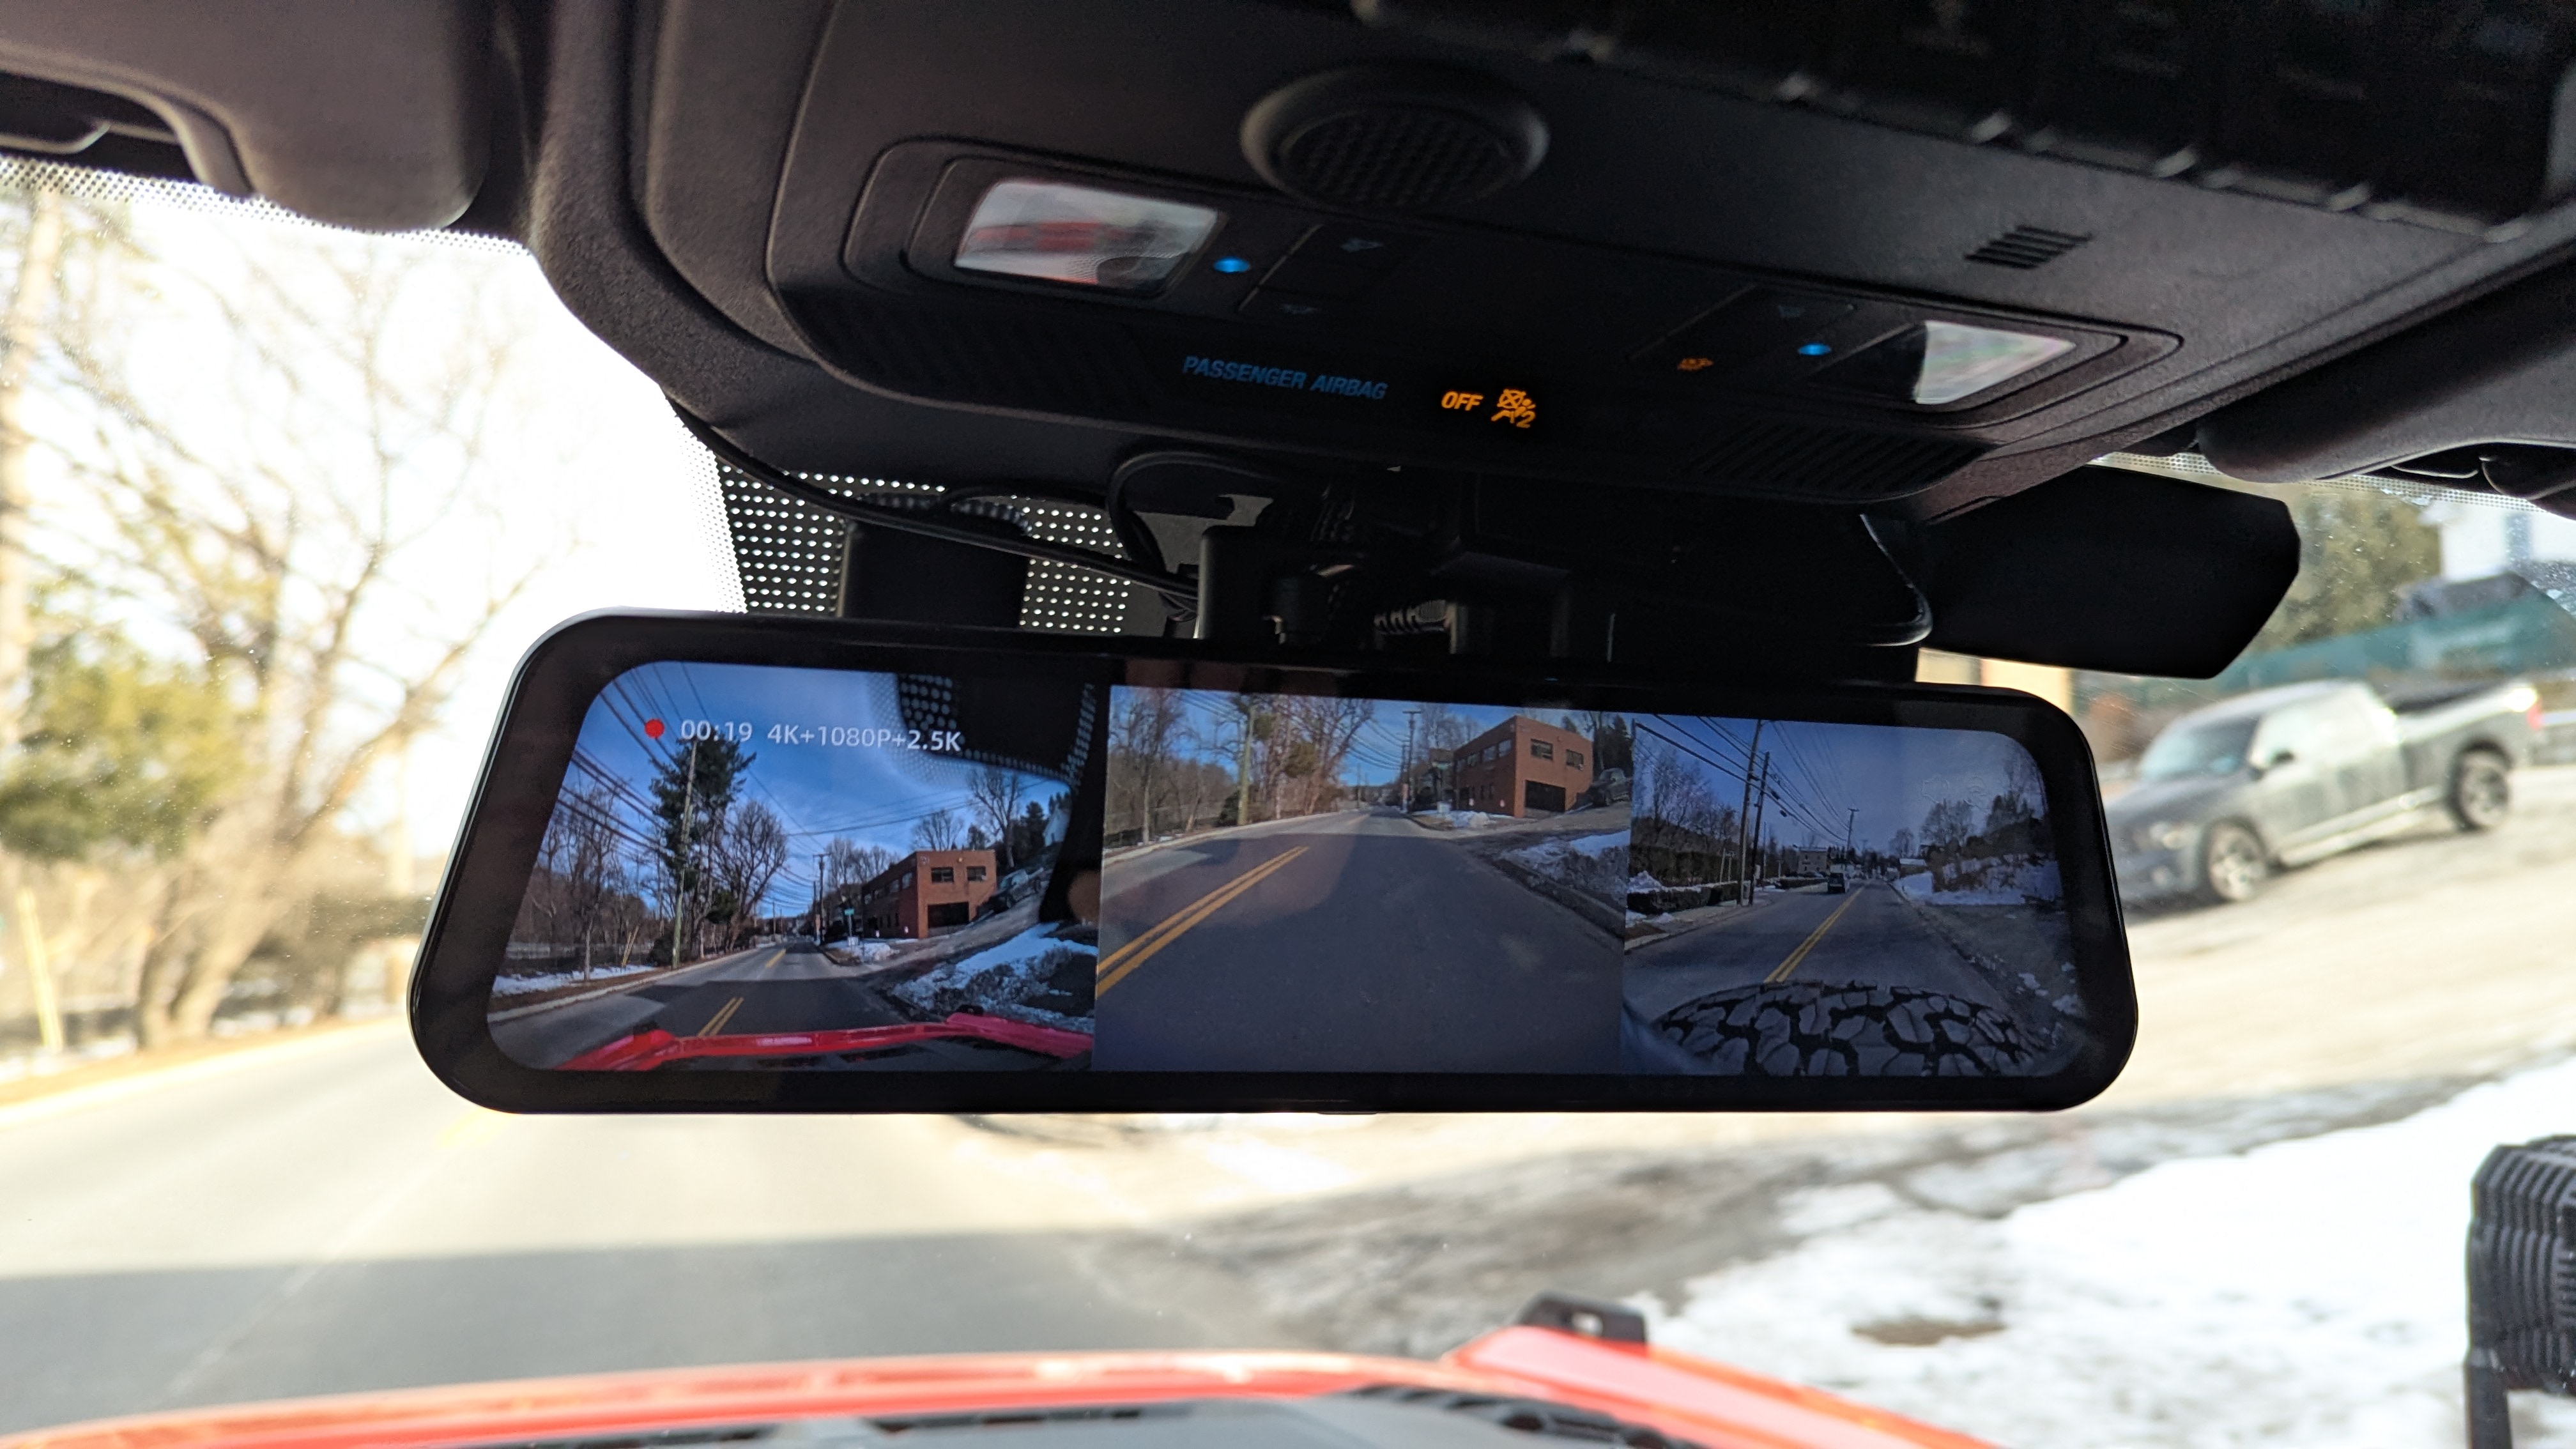
- Key Specs: I probably could’ve just done fine with the Wolfbox G900 Pro 2-Channel system, but the G900 TriPro had the added bonus camera for the front or anywhere else you’d think of putting it for an off-road camera. (There’s also an interior/cabin camera version) 4k Front facing “Dash Cam” built into the rearview mirror, 2.5k rear facing camera for the rearview mirror feed and the extra 1080p camera for the front facing or wherever you choose to mount it. 12” touchscreen mirror and a GPS antenna.
- What to expect from this review:
I was pretty stoked when the guys at Wolfbox asked me to do this review of the new Tripro G900.
I've never done a full-blown DIY install and review. At least not on video, but many of you have seen a lot of my DIY installs like my ARB compressor, revamp of my audio system and my KC Hilites Cyclone rock lights and A-pillar lights.
This is a new one for me – so don’t expect much from my video skills.
2. Unboxing: First Impressions
Packaging, What’s in the Box and Initial Aesthetics:
Let's start with the packaging. Really, really, nice packaging it’s compact, great design on the outside and as you open it up and unbox you see that they put a lot of thought into compartmentalizing and identifying the contents with some visual aids as well as text. This becomes critically important down the road because I read some horror stories of guys taking everything out of the box, not looking at it and then incorrectly swapping the rear camera for the extra camera that goes in front and they have a different connector. The rear camera being a 2.5k camera has a USB-C, with an added red lead to tap into the reverse lights should you choose to have the mirror function in that capacity. The extra front 1080p camera has a simple mini jack (headphone style jack). So if you go to the effort of running all those wires and get to the point where you're going to plug it in, you may be very disappointed to find out you've mixed those two up, but like I said the individual component boxes inside the main box do a really good job of identifying those so that you can be sure to set up properly.
The trim removal tool that they give you is good for tucking wires up around the headliner but that’s about it - more on that later. Since you're going to take apart your rear quarter panel cargo area, I would highly recommend getting a bigger more proper trim removal tool or a set off Amazon. There are a lot of fasteners back there and there is a particular section that I will go through in one of the videos that tends to break off... Ask me how I know – refer to last year’s subwoofer install pics.
3. Installation & Physical Setup
So what’s the install process look like?
- Difficulty Level: Scale of 1–10, I’d say it’s a 5 on average (for me it’s a 3 since there really isn’t any tapping into wires or fuse boxes – I used all plug & play connectors), take your time you don’t need any special tools either, just some patience and a general understanding of how the cameras are intended to operate.
- Tools Required: Trim removal (provided but not ideal), dielectric grease to waterproof the camera pigtail connections further, heat shrink tubing (also waterproofing), zip ties and/or electric tape (or automotive cloth tape), alcohol wipes to clean surface for 2 sided tape, T30 Torx/Torx plus bit (in your Bronco Toolkit) 13mm socket and 10mm socket if you have a slideout tailgate, T10 or 20 Torx (for factory mirror mount if replacing – I think I mention in the video which one fit) #0, #1 and #2 Philips screwdriver. And a blanket/towel or padded work area.
Installation for most Broncos and Bronco Raptors will be pretty straightforward. Remove the right side cargo panel. Unless like me, you have a slide out tailgate or some other enclosure you'll need to remove that first. You don't need to fully remove any of the B-pillar trim. You'll also see in the video/pics that I was able to snake a wire underneath with just a skinny fiberglass snake and pull that through. That B-pillar trim is a bit of a bitch because it's got the seat belt mechanism and all that, so I’d try and avoid pulling that apart if possible. Pulling out some of the lower A-pillar trim at the very bottom is needed near the kick panel speaker cover and will help you get that wire up around the top near the dash – you’ll have to remove any OEM grab handles as well to give you some room to navigate between the dash and A-pillar, and then using the provided or your own trim panel tool you can tuck that wire down so that it sits between the dash and the A-pillar trim without having to remove it. Then you can tuck it between the A-pillar trim and the windshield again without having to remove it – I tried to avoid all that because – you know – airbags and stuff.
Putting the OEM mounting bracket onto the Wolfbox mirror itself is pretty straightforward. You remove the four rubberized covers hiding the screws and j-shaped clips that the rubber straps would attach to. And then once you remove the screws make sure you save them, you're going to need them again. Flip the mirror over, the little rectangular inserts that hold the j-clips in place will fall out and then you'll be able to remove the j-clips. Then take your OEM mount bracket, put it in place. Make sure it's facing the proper direction and insert the 4 previously used screws and tighten, do not and I can't stress this enough, over-tighten. You can just put two fingers on your screwdriver and lightly twist them till they are essentially finger tight. You don't need to torque them down like crazy or you will rip the nutserts out of the plastic bracket.
I ran the rear camera down the passenger side and the front (extra) camera gets run down the driver’s side A-pillar and through the firewall. The GPS sensor I mounted to the left of the mirror on the dotted/shaded part near the center of the windshield at the top – there’s A LOT of extra slack there you need to hide.
There's a couple of ways to power up the mirror. One is via the included hardwire kit that will take you down the driver side A-pillar to the fuse box, or down the passenger side A-pillar and then across the back of the center console to the fuse box. I opted not to do that. I don't like having piggyback type connectors in my fuse panel and I was not planning on operating my dash cam in sentry mode. Instead, I used a Dongar adapter to connect directly to my factory mirror connector with a USB-C dongle to power the Wolfbox. The plastic trim cover over the windshield-mounted mirror and electronics does not have a lot of extra room in it. I know there are some guys that were able to stuff all the excess wiring in there with the Dongar adapter - I was having a tough time doing that, so I left the USB-C portion outside of the trim cover and the connector portion inside the trim cover.
Eventually, my plan in the spring when it's a little warmer, is to remove my roof panels and ultimately embark on the troublesome journey of removing the visors, both sides of the A-pillar trim and the header center console where my auxiliary switches are housed. That should enable me to clean up all that excess wiring, get it buried up in that header trim and eliminate my OCD twitches looking at the Dongar adapter and wiring that's there currently. It’s not bad – but I know it’s there whether or not I can actually see it in my line of sight (I can’t but it still bothers me – yeah I know, I have issues). I also plan on using some flat right angle USB-C adapters that will work with this setup. I'll provide an update here on this thread when that happens.
Getting the front camera set up is pretty straightforward also. Similar process as the rear. Find out where you want to mount it. I put mine dead center of my bumper directly below my Ford 360 camera using the two-sided tape that came with the wolf box. Also forgot to mention before, the fact that the cameras are set up with a separate little pigtail (the parts you want to waterproof) and you can run the wiring with just a connector separately works very nicely to be able to thread it through tight areas. One thing I haven't done yet, but I will add a little dielectric grease inside the connector to further waterproof and I will cover the connection point with waterproof sealing heat shrink tubing – (again I have issues – refer to ARB compressor wiring and stitching I did on a HDPE board with zip ties).
To get the front camera wire into the engine bay and front bumper area, simply locate the large grommet at the firewall and make a slight hole (mine was already there from other wires passed thru) and thread that through, it will come out right where your aux wires are. Getting that wire to the front bumper without taking the grill off is worth the extra time to thread it versus pulling more components apart in my view, I was able to drop it down near the back of the headlight and pull it out right at where the rubber gasket meets the chin valance just above the front bumper.
Once all those wires are tucked away neatly you can connect everything, mount the Wolfbox mirror on the OEM mount that is attached to the windshield and tighten that up.
One thing I was warned about with the Wolfbox (even by the Wolfbox team also) is that you will not be able to use your visors because of the added width compared to the stock OEM mirror. I am happy to report that that is not necessarily the case. The mirror mount articulates at the windshield end as well as directly behind the mirror, similar to the OEM mount and it allows you enough flexibility to shift the mirror to be dead center with a slight tilt towards the driver/ This allows you to use your visors with them ever so slightly touching the mirror as you push them forward – and let’s face it, there isn’t a whole lot of height to the windshield so the visors would block your view anyway – I only use them to lock my sunshield in place when I park which again – top off most of the spring / summer, so irrelevant.
4. Software & Configuration
- The App/Interface: The setup is straightforward, with lots of options to run through, language, time display, GPS display, voice recognition etc and select if they are on/off. You can choose the recording loop length between 1,2 or 3 minutes. This basically records 3 separate concurrent feeds from the cameras at those intervals, saves it and starts a new recording. You can also adjust the camera flip and mirror feature depending on which direction you mounted them (was a little confusing when I first turned it on so just be aware it can be changed. The dash cam on the back of the mirror has some pivot adjustment so you can aim it properly as well.
- I started out with all the display items on, because I hadn’t played around with the settings enough. There are different time stamp and GPS stamp options as well that get stamped on the recordings vs the “display” options are for what’s displayed on the actual mirror. I really like the cleaner look so I turned off all display options but left them for stamp purposes on the recording.
- If you tend to have a lot of conversations on the phone or sing along to music – you can also turn off sound recording – your call.
Once in the app you can view and download/save video clips – haven’t figured out how to download them outside of the app yet or if that’s even possible.
5. Performance: Does it Work?
Now that it’s set up, how does it actually perform?
- YES! It is so WEIRD after 2 years to now be able to see completely unfettered what’s behind me and the clarity is outstanding.
- Pros & Cons: Like anything else, there’s pros and cons to this:
High build quality
Intuitive app interface
Great visibility, even at night
Automatic recording and storage
Easy installation process
Cons:
Gotta bury a decent amount of excess cable
A lot of info on the screen all at once (but configurable)
If sun is directly behind you, the camera gets washed out
Can’t look in the mirror to see what’s happening in back seat or cargo area
Trim removal tool is more of a wire tucking tool
6. The Verdict
- Who is this for? This setup is perfect for A) anyone who is tired of the obstructed view in their Bronco/Bronco Raptor, B) anyone who wants a really slick dash cam setup with all of the features like g-force activation and auto recording from multiple sources C) anyone who wants a DIY option that doesn’t require tremendous know how or skill. D) If you already have the Ford 360 camera setup you can probably make do with the G900 Pro.
- Value for Money: Yes 100% worth the price tag, the quality and ease of use are both great.
- Final Score: Giving it a rating of 9 out of 10, since there are a few mounting things I’d change or fix (likely having a custom mount made for the rear camera – got one on the way from somewhere/someone else) and the difficulty in hiding the extra wiring at the header/mirror area, particularly the GPS sensor – doesn’t need that much cable at all – not sure there’s a cost-effective solution for that from a manufacturing standpoint.
Here is the youtube link - I have a few videos from the Wolfbox itself being added to the playlist (or maybe I'll leave them separate) - but they are uploading now and I wanted to get this posted before this Armageddon snow storm in the Northeast.

EOD-98, Mal