AGS Airgate ARB Twin Install

Mal
May 13, 2024

Trusted and Carefree

May 13, 2024

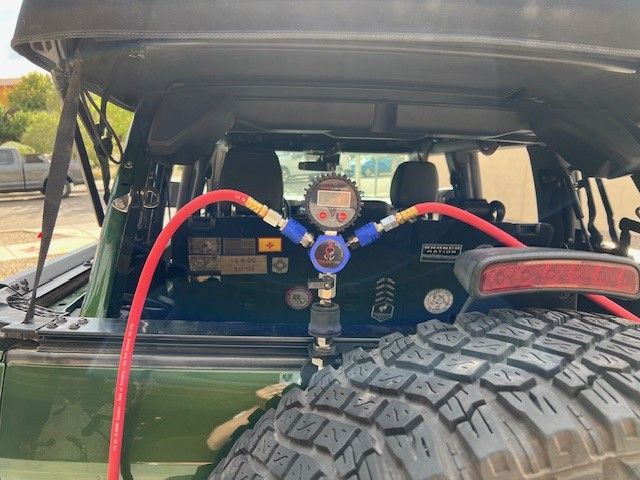
Hi friends. Finally got around to installing the AGS airgate and ARB twin compressor in the truck. I have had the bracket sitting in the garage for a year, but finally got it all installed this weekend. It was about 8-10 hours over three days, but I am pretty particular about how my electric connections work, and needed to swap out an antenna cable so, it probably could have been faster.

I decided to go with this one after kicking the tires on most of the other brackets around because I liked that it was using empty space and I wanted to not have to open the hood while I am airing up (this is the lamest reason around, but I am kind of a lazy person sometimes).

There are, however, two big drawbacks on this set up. The first is the weight on the tailgate- the compressor is not light. You can get a bracket with the tailgate reinforcement built in, but I did not like the way AGS’s reinforcement looked. The reinforcements I do like would make this not work out right because they mess with the tire carrier. So I am just going to roll the dice on the weight and see what happens.

The second is that the Compressor is way far away from the battery, meaning you need to figure out how to wire it. Lots of discussion on this point, but bottom line is you need a good 17-18 feet in addition to the ARB harness. AGS’ instructions are pretty pitiful on how they wired it, but I generally followed their routing. I also used the Expedition Essentials harness they recommended. I had just enough slack to get everything installed how I wanted it run without having to go where it fit.

I broke the install into three sections and tackled one each day. First I did the ARB harness, then I did the compressor and the bracket, and the final day was the connection in the middle. I did it this way because I was not sure If I would have enough slack to make the connection, and if I needed to splice it, I wanted to splice in the middle of the extension harness.
2023 Wildtrak. "Sometimes you got to get lost, to get found" -J Bronco
Deano Bronc, fresh coast

Trusted and Carefree

May 13, 2024

#1
The first day was the ARB harness in the front end and routing back till I ran out of space. I previously installed a GMRS radio under the dash and used this opportunity to swap out the 18’ antenna cable for a more manageable 6’ one. But that also meant the firewall plug was already cut out to make passing wires through easy.

I was concerned however about running all the connections to the battery, so I got a couple of distribution blocks off amazon and some large-gauge jumpers and installed them on top of the fuse box. This wasn’t my first choice of location, but it is what made sense with my cable constraints. I used a button-head hex screw and snugged them up tight and put some electrical tape over top of the heads. They aren’t touching any of the fuses though, but I wanted to be safe.

The ARB harness has two positive, one large negative and one small negative that have to be terminated and installed. I used ring terminals with heat shrink for these and ran them to the distro block. I also used this opportunity to move my radio feeds off the battery and onto the block as well, just to clean it up.

Here is everything installed
Battery.1.jpg

And covered up.

Battery.2.jpg

The harness has two large fuses near the terminating end, so you need to de-pin the harness to pass it through the grommet. This is not terrible to do, but did require a goodly amount of fiddle time to get it in place with minimal slack between the firewall and the connection point. Take you time and play around with it until it is where you want it. I used some zip ties to secure everything once it was in place.

ARB also uses a second smaller harness for the control signal. This harness is essentially the trigger wire for the relay that turns the compressor on, but it also has all the connections for air lockers and the switch (which I was not going to use). I cut all these off and sealed the harness up with the electrical tape, leaving only the purple trigger wire. I used a spade connector with this and ran it to an upfitter switch (one of the 10 AMP ones as its only a trigger wire). All this came back through the grommet as well with the larger harness. If I had to do this over again, I would probably cut the control harness down a little as it is very long. I didn’t because I wasn’t sure how much I would need, but I could have probably taken about three feet out of it.

After the harnesses were in the cabin, it was time to start routing them back. I removed the driver’s sill plate and the kick panel. I removed the grab handle and the trim cover in the forward door jam but, It looks like I didn’t really need to do that. The harness will fit in the space with the rest of the wiring under the sill plate. I ran it back, zip-tying as I went. I popped off the rear door sill plate and popped the B-pillar cover loose. The Arb harness ended here and this seemed to be a reasonable place for the connection.
Trim.1.jpgTrim.2.jpg
2023 Wildtrak. "Sometimes you got to get lost, to get found" -J Bronco
Deano Bronc, fresh coast

Trusted and Carefree

May 13, 2024

#2
The next day I tackled the bracket and compressor install. I also installed a mountains to metal rear antenna mount and moved the long antenna cable back here for a future project. And while I was messing around back there I decided to install an American Adventure lab cover over the access panel.

The AGS bracket and instructions are pretty straight forward and easy to follow so I wont recreate them here. Largely however, you pull the two black-ish access covers from inside the tailgate, unplug the connectors inside, remove the spare carrier, and pop-out the air pressure flaps in the tailgate. When I did this I found a pretty big dent back here, so it looks like someone backed into my tire at some point. It doesn’t seem to be bent out of spec and will be hidden by all this stuff so I have chosen to ignore it.
Passthrough.2.jpg

I went with the AGS kit that relocates the filters so those got installed. I also drilled an additional hole for the antenna cable, Installed the pass through, depinned the other side of the Expedition Essentials harness and ran it through the port.

Passthrough.1.jpg

And here is the mounting bracket with the compressor installed in place.

Compressor.1.jpg

Quick note on the Expedition essentials harness- it comes standard at 17 feet, but apparently you can get it made longer if you call. I found it to be enough, but your milage may vary. It is also in very loose shrink tube, so I hit all that with the heat gun to get it to be a little tighter for routing.

The harness routes out off the tailgate and along the body harness into the passenger side rear trim. I ziptied all this into place and tried to get as much slack out as possible. I broke a tab in the black wire run cover (right at the passenger side end) so that cover will have to get replaced eventually. When I do, I will probably cut a notch out to relieve a little of the tension (and keep me from breaking the panel again.

Tailgate.2.jpg
Instead of putting back on the back plastic cover on the back driver’s side, I installed the American Adventure lab Aluminum cover with a bottle opener. It came a little unfinished to my eyes so I polished the aluminum and painted the metal cap insert hot rod red. Because I am still a 13 year old boy at heart and I like shiny things. It installed tight, and I don’t think its going to rattle around.

American Adventure Lab.1.jpg

There are a couple different set ups for the air chuck on the AGS. I chose to go with the one that puts it on a tab at the top. I did this because I may change my wheels out in the future and didn’t want to have to get ones with spokes. Lots of adjustment here though so it could easily fit 37’s.

Airchuck.1.jpgAirchuck.2.jpgAirchuck.3.jpgInstalled.1.jpg
The Mountains to metal antenna mount simply bolts onto the tire carrier. Its out of the way, and again, lots of room if you want larger tires. I stuck an old antenna on there to keep the NMO mount out of the weather.
Here is the way it looks all installed on the back. Nice and tucked in.

Antenna.2.jpg
2023 Wildtrak. "Sometimes you got to get lost, to get found" -J Bronco
Deano Bronc, fresh coast

Trusted and Carefree

May 13, 2024

#3
The final day was the one I was dreading the most- taking all trim out to make this one connection. It was not terrible though. I watched as many videos as I could find about taking the trim out (the one from @1five1 was super helpful) and followed along. I would recommend doing the same.
I started by pulling out by the slide-out table (4 bolts and it lift straight out), then the trim at the front and tailgate sides (just pop out), then the little retainer pieces by the back tube of the rollbar on both sides, the soft top bolt covers on both sides and then the side panels themselves. I found it easiest to start in the back and work my way forward. I was super-nervous about this, but it ended up being no big deal. I didn’t even break any clips. I was left with an empty and dirt rear end.

Stripped Interior.jpg

Since I was in there, I went ahead and cleaned it all out, and installed kilmat on the big spaces. I have no illusion that I will perceive any difference- it’s a softee and I run around with the top down all the time- but I was in there and don’t intend to open it up again so why not. I looked at some of the precut kits, but just got a box off flea-bay for about $50. It was plenty.

Kilmat.1.jpgKilmat.2.jpg

The harness routed along the rear passenger side above the sub, crossed over the back with the body harness and dumped into the rear sill plate. It connected up easy to the harness from the front and still had a few inches of slack. I was worried this was going to not connect- Like doc brown with the lighting cable, but it was fine.
doc brown.jpg

Reassembly was the reverse and went together easy.
2023 Wildtrak. "Sometimes you got to get lost, to get found" -J Bronco
Deano Bronc, fresh coast

Trusted and Carefree

May 13, 2024

#4
With it all buttoned up it was time to test. I plugged in air-up and down hoses, and flipped the switch.

Thors lighting.jpgSuccess! The compressor fired right up. I aired down to about 25psi, and then ran all four back to 39PSI in about three and a half minutes. I will take it. All in all a good project, that looked a lot more involved than it actually was.
2023 Wildtrak. "Sometimes you got to get lost, to get found" -J Bronco
Deano Bronc, Chief Ron

Trusted and Carefree

May 13, 2024

#5
List of things:
AGS Air-gate kit
https://agsoffroad.com/products/2021-bronco-air-gate-kit-1

Expedition Essentials Harness
https://expeditionessentials.com/products/bedside-compressor-mount-extension-harness

ARB Twin compressor- I got this from @4x4truckleds- pro tip- put it in your cart and request a quote to get a discount.
https://www.4x4truckleds.com/arb-on-board-high-performance-12-volt-twin-air-compressor-ckmta12/

American Adventure labs Cover
https://americanadventurelab.com/product/ford-bronco-tailgate-hump-cover/

Mountains to Metal antenna mount
https://mountains2metal.com/tailgate-flag-antenna-mount-bracket/
2023 Wildtrak. "Sometimes you got to get lost, to get found" -J Bronco
Deano Bronc, fresh coast
Moderator Staff member

Administrator

May 13, 2024

#6
Excellent write-up, @Mal. Sorry about the dent you discovered. We found one of those on one of the BN Broncos after swapping the spare one day.
2021 Oxford White 2-door non-Sas Mid package 2.7L/10-speed Badlands with MIC top
2021 Carbonized Gray 2-door Sas High package 2.7L/10-speed Badlands with MIC top
Keeping the Jeeps: stock '89 XJ and 3.5" lifted '00 XJ on 31s and '89 MJ
Deano Bronc, Mal

Trusted and Carefree

May 13, 2024

#7
Excellent write-up, @Mal. Sorry about the dent you discovered. We found one of those on one of the BN Broncos after swapping the spare one day.

Its not the first, and wont be the last. At least this one is hidden though. 😁
2023 Wildtrak. "Sometimes you got to get lost, to get found" -J Bronco
Deano Bronc, Chief Ron
Moderator

Life is a Highway

May 13, 2024

#8
@Mal, excellent write up! I like that you are repping your DAY ONE patch and sticker!
Deano Bronc, Chief Ron

Trusted and Carefree

May 13, 2024

#9
@Mal, excellent write up! I like that you are repping your DAY ONE patch and sticker!

Only a few of those in circulation. Got to represent the BN early adopters. :)
2023 Wildtrak. "Sometimes you got to get lost, to get found" -J Bronco
Deano Bronc, Chief Ron
Moderator

Life is a Highway

May 13, 2024

#10
Only a few of those in circulation. Got to represent the BN early adopters. :)

Of which, I was not one…I think that you and @Deano Bronc are the only two I have seen.🦶🏻🦶🏻🦶🏻🦶🏻
Deano Bronc, Mal

You must log in or register to post here.